Pages

Tuesday, September 24, 2013

I am a Wonky Triangle in a Right Angles World

Sometimes when I name my blog posts I just write things in the title that make no sense. Then I decide it is a metaphor or it has a double meaning and I leave it there. This is how I imagine poets write. The good ones. Make your own meaning.

I am feeling a bit punchy tonight. I had a terrible case of poison ivy this week. It was totally my fault. I was working and I saw the poison ivy, but I couldn't avoid it. I have been regretting that day of work ever since. I look terrible, I just want to take my skin off. Today I went to the magical doctor's office and she gave me things to make the itch go away. They are also steroids, with which I have a great deal of experience due to my freakish meat allergy. Steroids always make me a bit punchy.


Also, that was a long story. Maybe not that long...

Oh right, this is a sewing blog. The point of this post is to reveal a super fun project I made to forget my itches. Sorry if you are new to my blog. I promise story time does not happen too often.

Nancy over at Owen's Olivia made this awesome paper piecing pattern (etsy or craftsy, pick your poison), and I tested it for her.

It is pretty much cool.


The pattern consists of long strips of wonky triangles, and you just paper piece them out until you are done, making something as long or as short as you like. I think she has three different sizes of wonky triangle strips for your sewing convenience.


I decided I would be convenienced (not a word) by the small triangles. I would make a little pouch for my epi pen and pencils (I know incredibly unsafe, but the epi pen is in a case already, I don't have kids, and it is a pen...sort of ). Besides the epi was looking ugly in my pretty new purse. We can't have that.


I pulled out my scrap bins and went to town. This pattern loves scraps. It's also fun to play with the fabric's volume on this one.

Blue is my favorite color. It matches my eyes. Throw in some hand stitching and a little fancy stamping.  Done.


Rewarding. Beautiful.

Go support Nancy (etsy or craftsy), this is basically a steal at $1.99. This is her first pattern and it is boss, I think we should expect great things. Plus, I think she is giving away free stuff on her blog.

Hugs from the giant series of blisters that is me,
Sarah

PS - Good chance I will not be able to sleep tonight due to the 'roids. Well, that is awesome.

PPS - You may have noticed the lack of poison ivy photos. You're welcome.

*I received this pattern for free in exchange for my testing services, all opinions are my own. Bacon's honor.*

Sunday, September 15, 2013

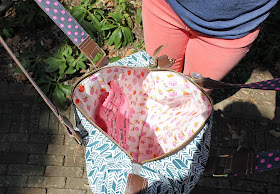
I Needed a New Purse. So I made an It's a Cinch Tote.

I have been wanting a new laptop bag/purse. You know something classy with a touch of whimsy, something I could travel with and feel cool. I have been eyeing patterns for a bit now, just looking for the perfect thing.


Also, it needed to have leather, because leather makes everything look more grown up and I have been hoarding this big bag of leather scraps.


I was thinking about the Super Tote, but it seemed just not quite right for my purposes (still want to make one though, lots of love for Noodlehead patterns). Then I saw this challenge in the Sew Mama Sew Super Online Sewing Match (whew, mouthful!).


The "It's a Cinch Tote" by U-Handbags (not a sponsored post).

I was in love. I just knew from looking at the entries that I could adapt this pattern for my very own self.

The pattern was also on sale (still has a coupon code active, check it).

I don't know about everyone else out there, but when Sarah makes a bag, she devotes herself to it.


Seriously, I cleared my schedule, bought the fabric online a couple of days ahead of time, cleaned my sewing room, trekked to Joann's for notions (hate that store), and sat down to do it. I put on a Spotify playlist and went for it. It only took me from Friday evening to Saturday evening (with sleeping, one happy hour, and a trip to the grocery store and farmer's market in between). I finished some little details on Sunday morning.

You are going to roll your eyes, but it really was a cinch. Some reviews online complained about the photos being located away from the directions. I guess this is a little annoying, but I am used to referencing photos from figure numbers, so it did not bother me. I would not read this one on a computer. Print it out.

I am going to run through my modifications really quick in case someone else wants to make it this way, but the pattern itself is really good. No head scratching moments at all, which is saying something because I nearly always have a moment or two. These will not make a ton of sense unless you are looking at the pattern. Also, they may just not make a ton of sense.


My mods to the It's a Cinch Pattern by U-Handbags:

- Measurements for two color bag. 10.5" for top print, 5.5" for bottom (when I joined these I used a half inch seam allowance, which made sense to me for stability). You need to cut the interfacings separately too.

- Bag straps (the ones on the bag) I cut 10.5" long.

- Here is the order you have to do everything to get this to work. Iron on interfacing, outside pocket (with zip), sew in interfacing/Thermolan (on all four pieces), straps onto top part of the purse, base, top-stitch base.

- Leather was cut to 1.25" wide in all places, which made sense with my hardware.

- The base meant that the zip pocket was about a half an inch shorter than the pattern called for, this did not bother me.

- Using leather for this is not for the faint of heart, it is extremely unforgiving. My sewing machine handled it sort of okay. I used a leather needle, a walking foot, and lengthened my stitch a little. This was also not my first time sewing with leather... The pattern calls for webbing handles, which would probably be cute. If you want to sew in fabric liner onto the leather (like I did with the polka dots), cut the fabric 1/4" wider than the leather (that would be 1.75" for a 1.25" wide handle). Then cut a 1.25" x length desired bit of woven interfacing. I think I use craft fuse. Fuse that to the center of the wrong side of your fabric, then fold the raw edges in 0.25 inches on both sides. Then topstitch the fabric to the leather wrong sides together, using clips to hold it in place. The interfacing is very important! Without the interfacing the bulk is too different between the fabric and the leather and the fabric will get caught in your feed dogs (at least mine did on some test pieces).

- I "basted" my leather to the bag outside using a basting tape and ironing it on the reverse of the bag, though the fabric. This helped make the top stitching easy.

- Remember how I said my machine handled it sort of okay? I had to hand stitch the leather cinch tabs on all four corner because they were too thick for my machine. The bobbin was literally not making its way up through all of those layers. To do this hand stitching, I machine stitched through the leather a couple of times to make holes so I could get the hand sewing needle through the layers. I broke hand sewing needles doing this. (PSA - use a thimble).


If I forgot something and you need to know it, just send me a little note in the comments.

Consider yourself purse bombed.

Heart you all.

Sarah

Materials List:
Outside - Feathers by Alison Glass in Indigo (I think), Essex Yarn-Died Linen, Coats and Clark metal zippers, Robert Kaufman Neon dots, leather from a scrap bin (bought by the pound, no good source)
Inside - Heather Ross Briar Rose Strawberries and some random Japanese (can't remember the designer or manufacturer)
Hardware - Joann's
Thread - Aurifil
Dimensions - 18" x 12" x 4"

Sunday, September 8, 2013

Bacon Seen in the Wild

If you have been hanging about here for awhile you may know that there have been tons of baby quilts in my life recently.

I thought I would take a second to show you some of my quilts with their BABIES!

Here is Hunter with my Confetti Baby quilt.


Work it Hunter. Look at that smizing.


This is Samantha with the Untitled Baby Edition.


Apparently she was fascinated with the hedgehogs and the bright colored rectangles. They draw my eye in too Samantha.


Finally Baby DJ with the Ducks in a Row quilt.


DJ does not get out of bed for such minor things. Clearly. 

It is super fun to see my quilts getting play on and loved (drooled on probably too). Cue satisfied sigh. 

Hope you had a fantastic weekend.

Love and Kisses from good old North Carolina,
Sarah


PS - These photos were passed on by some of my favorite people to share with you all. Thanks Kathie, Tracey, and Lisa! Photo credit deserved, plus your babies are pretty. 

Wednesday, September 4, 2013

Back with Something Minor to Report

When I started blogging I read a couple tips for bloggers. One of the things I learned is that a blogger should never apologize for an absence. Apparently, people don't like reading other people's apologies.

I am sorry I have been MIA

I have always been a bit of a rebel (this statement is not really that true).

I think I was busy, but I can't remember what I doing.

Meanwhile back in the sewing room, I had a super productive sewing weekend. I finished the binding on a quilt, but I have not managed to work up the energy for a photo shoot.

I finished a rocking border for one of the medallion traveling quilt groups I am in (seriously, I am in two medallion alongs right now). This is a secret quilt, so I can only show a peek. You will have to trust me, it is boss.


This is Paige's quilt and I do not think I am going out on a limb when I say, we are heading exactly in the direction she pointed us.

Then I made the center/starter for my SURMA medallion traveling quilt group I am doing. This one is with my mountain sewing ladies, although we prefer to think of ourselves as members of Sigma Sigma Upsilon. It is not secret, so I can show you my work every month (for you savvy instagram people #surmasewing).


My medallion theme is "I love color." I am going for a color block/low volume theme, where each border is a scrappy version of a different color (chosen by the maker that month). I decided to make the center my favorite color, BLUE!

The block was made using the Ice Star pattern, which is free from Sew What Sherlock. Full disclosure on this buddy, it was a great pattern, very easy to follow and gorgeous, but it took FOREVER.


I am showing you this picture to give you an idea about how many pieces it took.

My center is now out in the wild, I will not get to see it in person for about a year... But I will get to see pictures.  Yay!


I have some neat projects in the works. I promise I will come back soon.

Tonight I am in a hotel room and I am exhausted. I think I might even be too tired for reality TV... bizarre...

My next post will be cuteness overload, so prepare yourself (I feel I should mention it will not be my cat, although he is cute).

WIP Wednesday at Freshly Pieced