Pages

Wednesday, December 31, 2014

The Post in which I Discuss 2014 and Welcome 2015


I went through my photos to catalogue my makes from 2014 and I have to say my 2014 finishes were impressive. Both in quantity and quality. I am PROUD of this mosaic. My goal was two make more than 10 quilts, judging from this mosaic I made 13. That is 13 (!)  quilts. It is actually 16 quilts, because there is one I am waiting to share until after Quilt Con and two I just do not have good photos of (oops!). Some of the quilts in this mosaic have not been blogged about yet. Sorry!


Another goal was to donate two quilts to charity. I totally nailed that goal, two of these quilts were made for kids in need. I am trying to do my part to cover the world in quilts. Most importantly, I love both of these charity quilts. I always want to love my charity quilts, because I think everyone deserves to have something of beauty. Don't you?


I think I did stretch myself a little more as a quilter in 2104. I made things I love and tried new techniques. It made me feel like a rock star when I mastered a new technique or saw my creative ideas turn into something real.


I have serious regrets about 2014. I am just going to put it out here my friends, because I know that you will understand. I participated in a swap that made me feel used and a little unloved (don't I sound dramatic?). It is hard knowing that you have given a piece of yourself and your time to others and they did not care to fulfill their end of the commitment. The majority of my swap mates were not those people (and were amazing talented friends!), but it is hard sometimes to not let those few drag you down. Anyway, I am entering 2015 commitment free!


Exactly one year ago today I wrote this post. I just read it again and I think it was pretty great. The girl who wrote that post had her stuff together. I bet she would know what to write in this new years blog post. I bet she would not have writers block. She seems optimistic and fearless and full of goals. That girl does not seem to be with us today.


I still love lists, but this year the only sewing goal I can think of hardly warrants a list, but here it is.

1. Sew Joy.

That is it. Two words

Sure, I love finishing old works in progress. Yes, I want to expand and refine my skills in 2015. I am sure I would love to blog more and put myself out there more frequently. BUT, all of that is secondary to the real purpose of this all. All of this sewing, quilting, blogging, and creating is about joy. It is about fulfillment and happiness. It is about the part of me that wants needs to create and make. That needs to see the tactile made out of the theoretical.

Maybe at some point I will feel inspired to write a detailed list of tangible goals. For today, I am going to enter 2015 quietly and with one peaceful goal.


2015. You are going to be my year of joyful living. Please and thank you.

Happy new year friends! May it be full of health, happiness, and prosperity.

May it be full of joy.

Thursday, December 18, 2014

Bright Mountain for Dark Winter Days

There is a funny thing about a blog. When you go a bit without posting it is harder to post. It is a paradoxical notion for me because the longer I do not blog the more things I have to share. The more thoughts I have thought. But then I just have TOO much! It overwhelms me... and I go dark.


That, and I had to spend most of November in Tennessee for work. It is an awesome project, but really puts a damper on my blogging productivity. Strangely, I have finished a ton of projects. So here is project one!

Bright Mountain came about as the result of a guild charity challenge (Triangle Modern Quilt Guild!). We were given four fat quarters and minimum size and told to make a quilt. Truth alert: I hated two of my fat quarters. This stumped me for awhile. Then I realized, I am a grown adult making a quilt for charity.. I can use whatever fabric strikes my fancy. So, I pulled out the scrap bins and just started cutting.

I think scrap quilts are the most cathartic projects.


For this one I worked with a limited palette of bright yellow, navy blue, and "low volume" scraps. I did not use a pattern, but the block is a variation of the traditional Delectable Mountain block.

I did not count, I did not plan the placement... I just cut fabric up and sewed it back together.

It was balm for my soul.

The quilting is an all over angular pattern.

As soon as I can make it to a guild meeting (they are literally at the worst time of the week for me), this is going to head off to a Durham foster kid to snuggle underneath. I imagine it going to a little girl who is not a fan of pink or overly floral things... basically me as a kid. I imagine 12 year old me loving this. Hopefully, this is a bright point during some dark winter days.


I love you all. I hope you have a merry weekend before Christmas!

Quilt Stats
Name: Bright Mountain
Size:  approximately 50" by 60"
Fabric: Scraps! The "inspiration" from the challenge were Joel Dewberry herringbone and Modern Meadow yellow flowers
Quilting: Zagged all-over triangles with Aurfil Thread
Finished: November 2014 (thanks to binding help from my awesome friend Melissa)

Wednesday, October 22, 2014

Around the World Blog Hop here comes the Bacon!


My dear Internet and real life friend Tessa (you may know her as The Sewing Chick), tagged me in the around the world blog hop. Tessa is the best. Three things about Tessa before I start: (1) She has the BEST sense of style, this lady can combine some fabrics to make it her own. (2) She is an immaculate and precise seamstress (sewer? sewist?). You know she knows what she is doing and if you need help with something, she knows how to do it and probably has some tricks. She taught me the best way to put on binding. Seriously the best. (3) She is hilarious and adorable. I am proud to call her my friend.

So as I understand it, I am supposed to answer some questions about myself and give you some insight into my soul or something like that.


Let’s start with the basic stats. I am 29 years old. I live in Chapel Hill, North Carolina. I have been married to my best friend for a little over 4 years and we have been together for over 10 years. He is a fabric purchase enabler, a photo shoot assistant, quilt namer, great cook, plays hockey, historian, and super hero (at least to me).


I grew up in Portland, Oregon, lived in Denver for six years. I love the east coast, but I secretly miss the mountains, gray skies, and skiing in Oregon.

For my day job, I am an archaeologist. It is not glamorous and I do not have a whip or fedora. I do travel a ton and sometimes I bring a sewing machine. My specialty in my field is really obscure and techy.


I learned to sew when I was super little. My best friend’s mom made all of her outerwear and I was so jealous. I distinctly remember a raincoat with a cat patch on it that was handed down to me that I wore OUT. Fortunate for me, Susan was happy to teach, although I was not a patient student. I also joined sewing 4-H in middle school, where a very patient woman taught me and one other girl basically everything I know today. Sometimes I wonder how she is doing and if her little daughter grew up to love sewing with the passion she instilled in me.


I basically forgot about all sewing until graduate school when my friend was trying to make something with her new sewing machine and I surprised everyone (myself included) by jumping in and showing her how do everything (she did not know how to sew). Apparently, I did not forget anything.

I got a sewing machine from my parents for Christmas after I graduated. I made my first quilt while Derek was in Germany doing dissertation research. I started my second quilt almost immediately and I have not stopped quilting since.


What is my style?
I don’t know. I like color and pattern. I make quilts with patterns and without. I often start a quilt without doing any math and remain unconcerned with the results until the end. I rarely buy fabric for a project, but instead I spend way too much time cultivating my stash. I love traditional patterns and, I guess, I tend to approach them from a “modern” slant. Sometimes, I just get an idea and go for it. At the end of the day we are all quilters and I try not to take myself too seriously. My dream project is to make a quilt with a giant cat on it, made out of cat fabrics I have collected over the years. I am putting that out here because I trust you, my friends, to not steal that idea.


What are you working on now?
I just finished an epic binding marathon, so I should have some new things to share here soon. As far as actually working on, I have two quilts all basted and ready to quilt (soon, very soon). I have my paint chip quilt that I am quilting. Otherwise, most of my other projects exist in only my head right now. 

What is my favorite project?
Hands down my clamshell. I pretty much always love my latest finish the most of anything, but finishing my Pink Chowder quilt taught me I can do anything. I cut, pieced and quilted that. So bring it on.  I also made that quilt with some of my dearest friends, they gave me fabric to use as clams, they encouraged me. They complimented me and teased me. They brought me starburst and onion dip and diet coke and wine. Friends are the best aren’t they?


I am not going to tag anyone here. Not because I don’t love you, but this hop has been going on for a bit and I don’t want to call out those who have already been called upon. This post is also over a week late. Woops! If you want to play, by all means! Link your post below; I want to know what you think. I promise.

I am sorry if this is a little stream of consciousness and a bit long. I am writing it in a hotel room, I am on a work trip this week. I have barely recovered from my trip to my grandmother’s house and I had a conference all last week. I had a great time visiting with family and colleagues, but I am bone tired from what feels like constantly talking for a week.

I love you all. Thanks for being here, thanks for making it this far. I give you this cat.


xoxo,
Sarah


Friday, October 10, 2014

Tangelo It.

As I write this, I am sitting on a bumpy plane. I am jetting off to Oklahoma to celebrate my Grandmother’s 85th birthday. My Grandmother is an amazing person (I am sure your grandmother is too). This lady grew up in the middle of nowhere, rode a horse to elementary school and then boarded in town for high school.  She mothered five boys and one girl, who are six of the best Uncles, Aunt, and Dad a girl could ask for (Hi Aunt Barbara!). She has made to every grandchild’s wedding so far to be the best cheerleader ever, also, in the case of my wedding, help make some amazing pies. It has been getting harder for her to travel, so this weekend we travel to her. It is her turn to get celebrated and it is going to be a shindig! This woman has over 20 grandchildren and I have lost count of the great-grandchildren. I cannot wait. Rest assured that I made her a snuggly lap quilt for her armchair. I can’t wait to show you pictures.


Now that I have blathered on about one of my favorite people and inspiration, I am going to show you an unrelated finish.

Drumroll please….

My Tangelo!


Some of you (maybe all of you) may know, I am a huge fan of Carolyn Friedlander.  She is an amazing fabric and pattern designer and just one of the best people a girl could hope to know. Her patterns inspire me to combine color and texture. They make my heart sing in their striking, complex simplicity (it is a thing).

I have made it a personal resolution recently to make quilts for me and to try hard things. Now, when I say quilts for me… I do not actually mean I am going to keep them all, I mean when I quilt, I want to express myself just a little, even if it is for someone else. It is the way this is fun for me.

The Tangelo is for me. Blue is my favorite color. I love metallic.


This was also a hard thing. It took me nearly six months (not working constantly, but still). I worked on this quilt during two sewing weekends with my ladies. Then, I quilted this quilt all over with custom free motion quilting and used wool batting to make that quilting stand out. Also, it made this quilt super substantial and comfy). I had to piece the backing with geese, because a front this complex just needed a little something on the back.


I matched my Aurifil thread to each solid color. Yes, maybe a little obsessive? But, I need to do what I need to do. I don’t make money at this, we don’t need any more quilts to physically keep us warm in our home. What I NEED is to see the picture of colors and patterns I have in my head come alive.

Welcome to my living room Tangelo. I think I am going to like seeing you there.


Quilt Stats:
Name: Tangelo by Carolyn Friedlander
Fabric: Whites are from Architextures and Botanics both designed by Carolyn Friedlander for Robert Kaufman and Dear Stella Confetti Dots. The blues are assorted Robert Kaufman Kona cottons and Moda Bella solids. The backing is widescreen in gray by Robert Kaufman with Botanics and scraps from the front.
Quilting: Custom straight line with my free motion quilting foot with about six shades of Aurifil thread.
Batting: Quilters Dream Wool
Size: 68" x 72" 

P.S. - I got to introduce Carolyn to my Tangelo when she came to North Carolina to teach. This was a high point.


P.P.S. – The quilt is not quite straight in any of these pictures, but I must defend my quilt holder, this quilt is large and heavy. It far exceeded his wingspan and he is tall guy… I think I need a new photo set-up for big quilts.

Wednesday, September 17, 2014

Nordic Christmas in September

Hey friends!

This is going to be a short blog post. Mostly, I just want to check in here. Sometimes I feel like checking in with you all is one thing that seems to slow my crazy world down. When weeks and months fly by I can look back at this blog and remember that I was there in September. I was there, I was sewing things. My weeks and months are full of love and work and fun, they are bracketed by sewing projects and finishes.


If I were to have a timeline for my life right now, it might be a series of quilts. I have been working (paying, work work) so much! We are just slammed right now. When I am not working I am thinking about work. Sewing is my sanity. My quiet place. I think you know what I mean.

Speaking of sanity... finishing projects is its own kind of sanity.


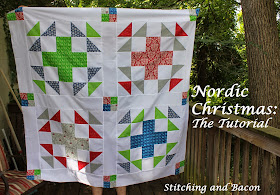
I finished my Nordic Christmas quilt (originally blogged here).

I love it. It is my kind of Christmas quilt. Subtle. Slightly traditional. Clean lines. 


I quilted it with a woodgrain design. It is my first time with this design and it was actually really fun.

We did some photos when were up in the Blue Ridge Mountains for our annual getaway. I wanted to share the process, because it was funny.


Do you all see my hair flying? I laughed out loud when I saw this picture. 


 Apparently I laughed out loud then too.

Then, finally a good picture.


Quilt Stats:
Name: Nordic Christmas (Tutorial avalaible here)
Size: 65" x 65"
Fabric: Folk Art Holiday by Gina Martin for Moda
Quilting: Woodgrain quilting with Aurifil thread
Finished: August 2014


I love you all so I am leaving you with this soothing picture. Mountains are my happy place. 


Wednesday, July 23, 2014

Nordic Christmas [Christmas in July]

Merry Christmas in July! This is a tutorial for a quick Christmas quilt. Seriously quick and fun. It is a Scandinavian inspired design I put together for Folk Art Holiday. This is something you can whip up quickly and enjoy all Christmas season! I just super sized this classic block for a fresh and fast Scandinavian inspired quilt.


Make sure to head over to the Sew Lux Blog to see the other fab tutorials.

As always, if you have any questions or if I made a mistake (known to happen, I am not a professional) let me know. I am happy to help and would love your input.

Nordic Christmas Tutorial

Finished Quilt Size: 65” x 65”
Finished Block Size: 25” x 25”
All seams are a scant ¼”
Skill level: Confident Beginner

Please read all of the instructions first before you start. 


Materials:
8 Fat Quarters of Folk Art Holiday (Available here)
4 yards backing fabric
½ yard for binding
Coordinating Thread (I used this)

Supplies:
Basic quilting supplies (rotary cutter and mat, ruler, scissors, sewing machine, iron, etc)
6.5” Square Bloc-Loc Ruler (optional, but helpful)
Rotating cutting mat (optional, but helpful)

For each block cut (parenthesis note the prints from my example):
6 – 6 x 6” squares white
4 – 6 x 6” squares Print B (Green)
2 – 6 x 6” squares Print C (Blue Snowflake)
8 – 5.5 x 5.5” squares white
2 – 5.5 x 5.5” squares Print A (Blue Bird)
1 – 15.5 x 5.5” rectangle Print A (Blue Bird, cut this directionally so the birds stand upright, horizontally the long way)


1.    Make twelve (5.5 x 5.5”) half square triangles (HSTs) blocks, eight of Print B and four from Print C, using your 6 x 6” squares of the print fabrics paired with white. You can use your favorite method to make these HST blocks, I outline my favorite below (using your 6 x 6” squares):

a.     Draw a diagonal line through all six of the white squares using your fabric pen or a pencil.


b.     Pair the white squares with squares of Print B and C, right sides together.


c.      Sew ¼ inch on either side of the diagonal line for each pair of squares.


d.     Cut along pencil line.


e.     Press blocks, with seam toward darker fabric (print).


f.      Trim each HST unit to 5.5 x 5.5” (Use your Bloc-loc and rotating mat to make this painless and quick).


g.     You should have twelve half square triangle units (eight from Print B and four from Print C, all paired with white).


2.    Now it is time to layout your block. It is a 5 square by 5 square block unit. Lay the block out as pictured below (time to get Print A involved).


3.    Sew together in horizontal rows. When you are finished with rows 1 through 5, press the rows in opposite directions, row 1 to the right, row 2 to the left, row 3 to the right, etc. I used a technique called webbing my block (for a tutorial on that, see this video).


4.    Sew five rows together.


5.    Repeat to make four blocks. Each block measures 25.5” square.


Corner Stone Instructions:

Cut:
Eight – 3” by approximately 15” strips of each print you would like to use (I chose two red, two gray, two blue, and two green, using the Print A from each block.)


1.     Sew strips of the blue print to the red print, then strips of gray print to green print. Make sure you check to ensure directional prints are facing the same direction.

2.     Press all of the seams to one side (up for the blue and red and down for the green and gray).

3.     Cut 3" strips from the long strips. You need nine from each fabric set.


4.     Take one from each combination and sew together so seams lock. If you want all of your cornerstones to look the same just make sure to sew them in the same orientation.


5.     You will finish with nine 5.5 x 5.5” four patch blocks.


Sashing/Layout and Assembly:

Cut: 
Twelve – 25.5 x 5.5” strips of white for the sashing.

1.     To the left of each 25.5” square block attach a sashing strip. Sew blocks together in large strips and add one more sashing strip at the end. So your block units look as pictured. Press seams towards sashing.


2.    With the remaining sashing strips attach them with the four patch corner stones in between each strip. You will have 3 long strips. Press seams towards sashing.


3.     Sew sashing onto blocks, use pins at this stage to line up seams (even if you never use pins, trust me, you'll want to here).

4.     Sew rows of blocks together to complete your quilt top (use pins, you may need to ease in some seams to your blocks line up perfectly).

5.     Press! Step back and enjoy!


Now you can baste, quilt and bind your quilt in your favorite way!

I am off to finish this one. I will make it my personal goal to have this finished to show you by the end of the Christmas in July Challenge. I can’t wait to see what you make. 

Link up your projects by between July 21st and August 4th on the Sew Lux Blog for a chance to win fabulous prizes. More importantly, get a jump on the Christmas sewing and avoid the craziness that can come with that season! 


For complete challenge details see here.

Full Disclosure: This fabric was given to me in exchange for writing this tutorial, but I love Sew Lux and I buy fabric there all of the time. My endorsement of the shop is heartfelt and my opinions are my own.